


Bare-root hedging is one of the simplest and most budget-friendly ways to fill your garden with luscious greenery by spring.
Whether you’re after a bit of extra privacy to enjoy your outdoor space in peace or want to add a stunning feature to your garden, we’ve got you covered.
Our step-by-step guide to planting bare-root hedges will show you exactly how to get the job done, when the best time to plant is, and how to care for your new hedge so it stays healthy and happy for years to come.
Contents
- What is a bare-root hedge?
- What are the benefits of planting a bare-root hedge?
- When is the best time to plant a bare-root hedge in the UK?
- Should I plant a single or double-row hedge?
- How long can you keep a bare root hedge before planting?
- How to plant a bare-root hedge
- How to plant bare-root hedges quickly
- How to care for your bare-root hedge
- When can I prune my new hedge?
- How long does a bare-root hedge take to grow?
What is a bare root hedge?
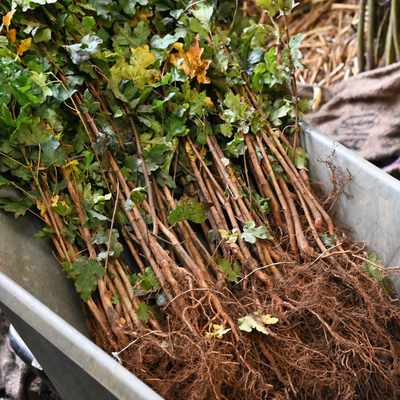
Bare-root hedges are plants that start their journey growing in the ground at nurseries, where they’re nurtured to perfection. Once autumn arrives and the plants go dormant, they’re carefully dug up and bundled together without soil around their roots — hence the name ‘bare-root’ plants!
They’re a brilliant choice for gardeners looking for an easy and cost-effective way to plant hedges.
Curious about the other ways hedging plants are sold? From pot-grown to root-ball options, read our guide to hedging root types.
What are the benefits of planting a bare-root hedge?
Budget-friendly — Using bare-root plants to start a hedge is a cheaper alternative to pot-grown hedges. Without the extra weight of soil, they’re lighter and easier to transport, which helps keep costs down.
Quick root establishment — Bare-root plants are quick to adapt to their new home in the soil, giving them a head start on growing.
More environmentally friendly — Unlike container-grown plants, bare-root hedging doesn’t rely on plastic pots. With just the soil and plants to think about, they’re a more environmentally friendly way to create a beautiful garden.
When is the best time to plant a bare-root hedge in the UK?
You can plant bare-root hedges anytime between November and March/April in the UK (weather and season dependent), but getting them in the ground early in autumn gives them the best start. The roots will have plenty of time to settle in and get strong, ready to support lush stem and leaf growth when spring rolls around.
It’s best to avoid planting during:
Icy or snowy conditions — Once buried, the ice or snow will stay frozen for months, slowing the time it takes for your roots to establish or even killing your plants.
Wet weather — Heavy rain can leave the soil waterlogged and compacted, making it too dense for delicate new roots to grow and establish properly. If the ground has been soaked from recent rainfall, it’s best to wait until the soil has had a chance to drain and become easier to work with.
Very windy conditions — Wind can rock your plants, creating air holes in the soil and exposing drying winds to the root, limiting growth. If you need to plant, keep the bundle of bare roots in a sheltered place or in the packaging, and just take out a few roots at a time to minimise their exposure.
For more tips and advice, read our guide on how to plant hedging.
Should I plant a single or double-row hedge?

Deciding between a single or double row of hedging? It all comes down to how thick and lush you’d like your hedge to be, how much privacy or screening you’re after, and the space you have to work with.
A double-staggered row is perfect for creating a dense, bushy hedge that gives you plenty of coverage, while a single row is a great option for smaller gardens or where a slimmer, more compact hedge is the goal. Both will bring beautiful greenery to your garden!
To learn more, read our guide to planting density.
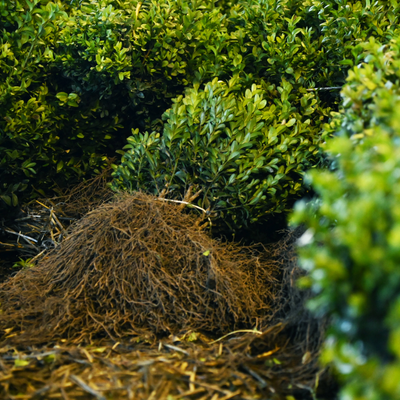
How long can you keep a bare root hedge before planting?
Ideally, bare-root hedges should be planted as soon as possible after they arrive — this helps keep the roots from drying out and gives them the best chance to establish. But if you need to wait a little longer, don’t worry — you’ve got a few options to keep them happy.
Here’s how long you can keep them before planting and how to store them:
- Short-term storage (a few days) — You can store them for a few days in a bucket filled with moist compost over the roots. Keep in a dark, unheated but protected space like a garage or shed (but not a greenhouse as it's too warm). If they’re exposed to too much light or warmth, they may start to come out of dormancy.
Longer-term storage (a couple of weeks) — If it's going to be longer than a few days, you can 'heel them in.' This involves planting the hedges temporarily in a shallow trench with their roots covered in loose, moist soil. Plants that have been 'heeled in' can be kept like that for a couple of weeks and sometimes longer (depending on the weather). However, they must be planted before spring. If they start to come out of dormancy while heeled in, replanting them in a different location can be hugely detrimental and result in them failing.
How to plant a bare root hedge
Planting a bare-root hedge is fairly easy and requires few tools. We’ll walk you through our simple steps to get the job done.
To get started, you’ll need:
A garden spade
Soft string or twine
Method
1. Prepare the hedge

Your hedge roots must stay moist, so try not to leave them out of the soil for more than a few days. When your hedge bundle arrives, pop it straight into a bucket of water and give the roots a good soak for at least a couple of hours to rehydrate them.
It's best to get your bare-root hedges into the ground right away. However, if you need to wait, you can temporarily store them in moist compost or 'heel them in' until conditions improve. Avoid rushing the job or planting in poor conditions like windy, wet, or frosty weather — it's worth waiting for the right moment.
2. Prepare your soil
If your soil needs a little extra love, now's the perfect time to give it a boost! Healthy, happy soil is the foundation for a thriving hedge, and with a bit of preparation, you'll be setting your plants up for success.
For poor soil, mix in well-rotted garden compost, farmyard manure, or a general-purpose compost to enrich it.
If the soil is very wet, add sharp sand or lime-free coarse grit to improve drainage and create a welcoming environment for the roots.
You'll also want to check the soil is loose and easy to work with. Remove any pesky perennial weeds, so all the water and nutrients in the soil goes straight to your hedge.
Once your soil is ready, you're all set to dig the trench!
3. Dig the trench
Get the site ready for your new hedge by digging a v-shaped trench that's slightly wider than the roots to give them plenty of room to settle in.
The depth of the trench is also important because the soil level needs to reach the old soil mark on the stems (the point where the plant was previously growing in the ground). This prevents the roots or stems from being exposed.
For smaller plants (up to 60cm tall), aim for a trench that's at least 30cm (12") wide so they've got room to spread and 25cm (9") deep. If you're planting larger varieties, go for a wider and deeper trench to accommodate their needs.
If you're using canes to support taller plants or to secure rabbit guards, be careful where you position them. Take note of where to drive in the cane so that the roots won't be damaged.
It's a good idea to use a garden fork to loosen the soil along the sides and bottom of the trench. This not only improves drainage but also makes it easier for the roots to take hold and establish themselves.
4. Prepare your plant fertiliser
While all the species we sell are happy to grow in decent soil without extra conditioners, adding a little fertiliser can give them a great head start.
Bonemeal is an excellent option for promoting strong root growth, but it's important to handle it carefully. Because it's a strong fertiliser, bonemeal should never come into direct contact with roots or stems as it can 'burn' the plants.
Instead, sprinkle a handful into the bottom of your trench and use a garden fork or spade to mix it thoroughly with the soil or compost. And remember to always wear gardening gloves when handling fertilisers.
For an even bigger boost, we recommend using RHS-approved Rootgrow. It's specifically designed for bare-root plants and contains friendly fungi that work with the roots to help them access moisture and nutrients in the soil. This partnership not only speeds up establishment but also encourages vigorous growth.
Unlike bonemeal, RootGrow needs to come into direct contact with the roots to be effective. Just follow the instructions on the fertiliser packaging to ensure you use the correct amount. Typically, this involves mixing the granules with water in a bucket to create a slurry and dipping the roots into it before planting.
For more tips, check out our guide to choosing the right fertiliser for your garden.
5. Mark the area with string
Take a long piece of string and stretch it along your trench where you plan to plant your hedges. This simple trick helps keep everything in a nice straight line.
6. Place your hedging plants
Dip the roots of each plant into your fertiliser to give them a boost, then carefully place them into the trench one by one. Repeat this process for each plant, taking your time to get the spacing just right.
As a general rule of thumb, aim for about three to five plants per metre for a single row. If you’re planting a staggered double row, you can increase this to five to seven plants per metre for a denser, bushier hedge.
Bear in mind that this can change depending on the species. For example, Cherry Laurel tends to be quite bushy, so you may need less per meter than Beech hedging, which is more slender. You can find specific planting density recommendations for our bare-root plants on each species page, or read more about planting density in our guide.
If you want extra coverage, plant more closely together to create the perfect level of thickness for your garden.
6. Backfill the area
Once your hedging plants are in place, it’s time to backfill the trench. Use a spade to add soil back into the hole, spreading it evenly to around six inches high. Gently press it down with your foot or the back of your spade to firm it up — this helps remove any air pockets that could let frost sneak in.
Make sure the soil is snug around the roots but not overly compacted, as squashing it down too much can damage those all-important root systems.
Repeat these steps until the trench is full, ensuring all the roots are covered while the stems remain exposed and ready to grow.
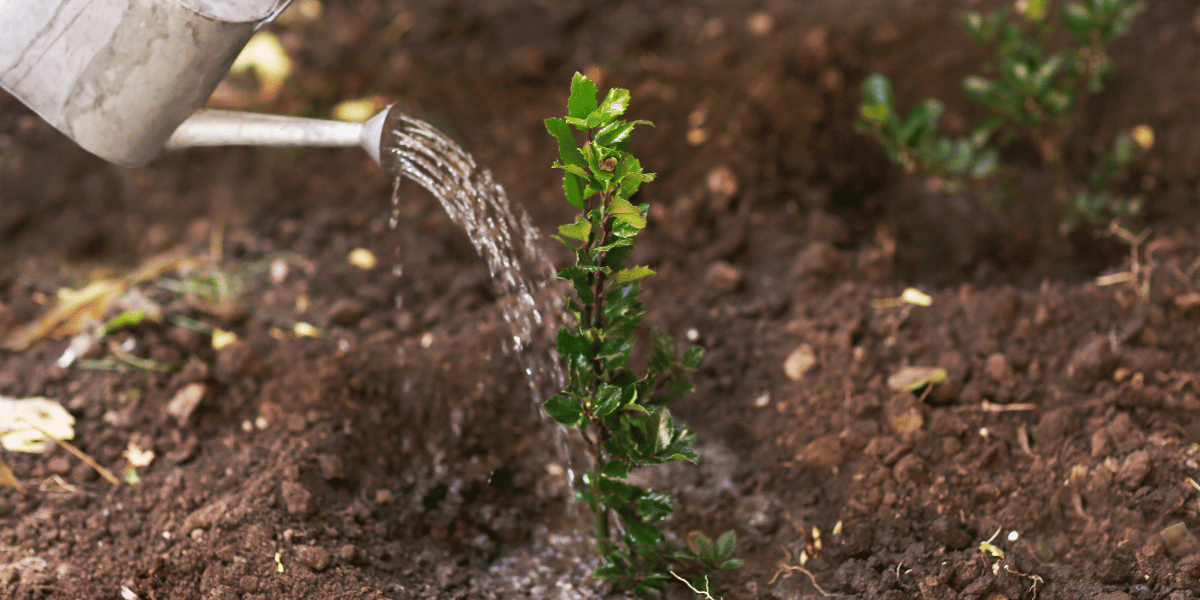
7. Water each plant
Give each plant a good, deep drink by watering at the base — around five litres per plant should do the trick. Keep up this routine twice weekly for the first year to help your new hedge establish strong roots.
For extra care, consider adding a layer of bark mulch around the base of each plant (but be sure it doesn’t touch the stem). This handy addition helps suppress weeds, lock in moisture, and shield your plants from frost.
How to plant bare root hedges quickly
Got a large project or long stretch of hedging to plant? We get it — sometimes speed is key! While the above trench planting method is always recommended for the best results, there's a quicker option if you're working with small bare-root plants.
Instead of digging a full trench, you'll create individual gaps or ‘notches’ in the soil for each plant. This technique, known as notch planting, is a brilliant time-saver.
Before you begin, make sure you've ticked off all the essential prep steps — like loosening the soil, checking your spacing, and soaking the roots — to give your hedge the best chance to thrive.
Once that's done, here's how to notch a plant:
- Grab a sharp spade and push it into the soil to nearly its full depth.
- Push the spade away from you to create a small gap or 'notch' behind it.
- Slot the bare-root plant into the gap, making sure the roots are fully under the soil.
- Release the spade and gently firm the soil back down around the plant with your foot.
With this method, you'll need to regularly check your plants after frost or in dry weather to make sure the notches haven't reopened.
And remember, this method is a bit of a trade-off — it's quicker, but you might experience a slightly higher failure rate compared to the standard trench method.
How to care for your bare root hedge
Make sure your hedges have space
For the first two to three years after planting, make sure to keep weeds and long grass away from your hedge. This gives your plants plenty of space to soak up all the nutrients, light, and moisture they need to grow strong and thrive.
Water often
One of the biggest factors in whether your hedge thrives or struggles is water — even in winter when plants are dormant. This becomes especially important in March, April, and May when deciduous plants break dormancy and begin to grow.
How often you need to water your hedging plants will depend on the weather: monitor regularly to ensure they don’t dry out during hot conditions or become waterlogged when it’s raining.
A good guide for dry weather is to use at least five litres of water per metre of hedging twice a week.
We always recommend watering in the evening, as this prevents the sun from evaporating the water before it reaches the roots.
Evergreen hedging plants, like yew and cherry laurel, may also benefit from a light spray of their foliage. This helps keep their leaves hydrated, particularly during warm or windy weather, when moisture loss can happen fast. However, to minimise the chances of sun scorch, we’d recommend only spraying evergreen foliage early in the morning or later at night outside of when the sun’s rays are the strongest.
Protect from the wind
Strong winds can rock your new plants, exposing their roots to drying air or even letting frost creep in. To keep your hedge safe and snug, gently press the soil back down with your foot if it loosens.
For extra protection in particularly windy spots, you can put up windbreak netting. This helps shield your plants from the worst of the weather, keeping them secure and giving their roots a chance to establish properly.
Be patient with your new hedge
In their first year, bare-root hedges can take a while — so don’t worry if things seem a bit slow! It’s completely normal for bare roots to leaf or flower much later than established plants in their first year after planting.
Evergreen plants, or even semi-evergreens, often lose some leaves (known as defoliation) or develop yellow foliage when they’re transplanted. This can also happen when they first face warm, dry weather.
If you notice this, don’t panic — it’s just your plants adjusting to their new home. Simply increase how often you water them (but avoid overwatering and making the soil waterlogged), and you’ll soon see fresh, healthy leaves appearing.
Patience is key, and your hedge will reward you with strong, vibrant growth in no time!
Apply fertiliser and mulch
Hedge plants grow close together, meaning their roots naturally compete for water and nutrients in the soil. On top of that, regular trimming removes some of the leaves that help your plants produce food.
To keep your hedge healthy and growing strong, it’s important to give it an extra boost with fertiliser or mulch. Fertilising in spring is particularly helpful as rising temperatures encourage fresh growth.
How to mulch
Mulching is the process of adding a protective layer of organic material, like well-rotted compost or manure, around the base of your plants. It helps retain soil moisture by reducing evaporation, suppressing weeds and improving soil health by slowly releasing nutrients as it breaks down.
Here’s how to apply it to your planted bare-root hedges:
Choose a well-rotted compost or manure to mulch your hedge.
Spread the mulch around the base of your plants, but don’t let it touch the stems, as this can cause rot.
Create a layer about five to seven centimetres (two to three inches) thick, ensuring it covers the soil evenly while leaving a gap around the stems.
Mulch breaks down over time, so you’ll need to top it up annually to keep your hedge healthy.
How to apply foliar fertiliser
Foliar fertiliser is a liquid solution sprayed directly onto the leaves of your hedge, and here’s how to apply it:
Follow the instructions on the packaging to mix the fertiliser with water. Over-concentrating can damage leaves, so measure carefully!
Apply the fertiliser early in the morning or late afternoon to prevent the solution from evaporating too quickly or scorching the leaves under direct sunlight.
Use a garden sprayer to apply the fertiliser evenly across all the leaves, including the undersides, where nutrients are also absorbed.
Apply the foliar fertiliser once a year in spring when temperatures start to rise and plants are actively growing. If your hedge needs extra support, you can apply it again mid-season.
Just avoid using fertiliser before rain, as it may wash off before the plants can absorb it. Also try not to apply it in direct sunlight in case of leaf scorch.
When can I prune my new hedge?
Newly planted hedges usually only need light pruning in their first year, with more significant trimming starting later. However, the timing and amount of pruning depend on the type of hedge and whether you're going for a formal or informal look.
Here’s a general guide:
Deciduous plants — Most deciduous species, like beech or hornbeam, benefit from a light prune once planted and then trimming back about one-third of the annual growth the autumn after planting.
However, hawthorn, privet and blackthorn are a little different — these fast-growing species love being cut back! They should be pruned immediately after planting, with their new growth the following season trimmed by about half. This encourages them to bush out beautifully, giving you a fuller, denser hedge in no time.
Evergreens — Some evergreen species don’t need to be cut back, including yew and cherry laurel. The side stems can be trimmed after around a year, but the main shoot shouldn’t be touched until your hedges have reached the desired height.
The perfect time to prune your hedge is in early spring or autumn when most plants have fewer leaves. This makes it much easier to see what you’re doing and spot the areas that need trimming.
To learn more, read our guide on how and when to trim a hedge.
How long does a bare-root hedge take to grow?
Bare-root hedges may take three to seven years for them to reach their full, glorious size. Taking proper care of your newly planted hedge and keeping up with weeding and fertilisation during the initial months and years will encourage growth.
Help your hedges flourish with Hedges Direct
Planting your bare-root hedge is just the beginning of its journey. With the right care and attention, it will grow into a beautiful feature for your garden, providing greenery, privacy, and character for years to come.
Looking for more tips to keep your hedge in top shape? From watering advice to pruning techniques, take a look at our blog.
For a deeper dive into planting techniques and long-term care, check out our in-depth guide on how to plant a hedge.