


Hedging can make a world of difference when it comes to transforming your garden into a personal oasis. But if you weren't gifted with a green thumb, the thought of planting them might feel a little overwhelming.
This is where root ball hedges can be a game-changer. With their established root systems, they offer a simpler planting process and often deliver faster results compared to other options.
Whether you're a seasoned gardener or planting hedging for the first time, we’ll walk you through everything you need to know about root ball hedging — ensuring your garden boundaries thrive for years to come.
Contents
- What is a root ball?
- What's the difference between root balls and pot grown hedging plants?
- When to plant root ball hedging
- When not to plant root ball hedging
- How to prepare the planting site
- How to plant root ball hedging in 4 steps
- Aftercare and maintenance
- Root ball hedging troubleshooting
- Choosing the right root ball hedging
- Frequently asked questions
What is a root ball?
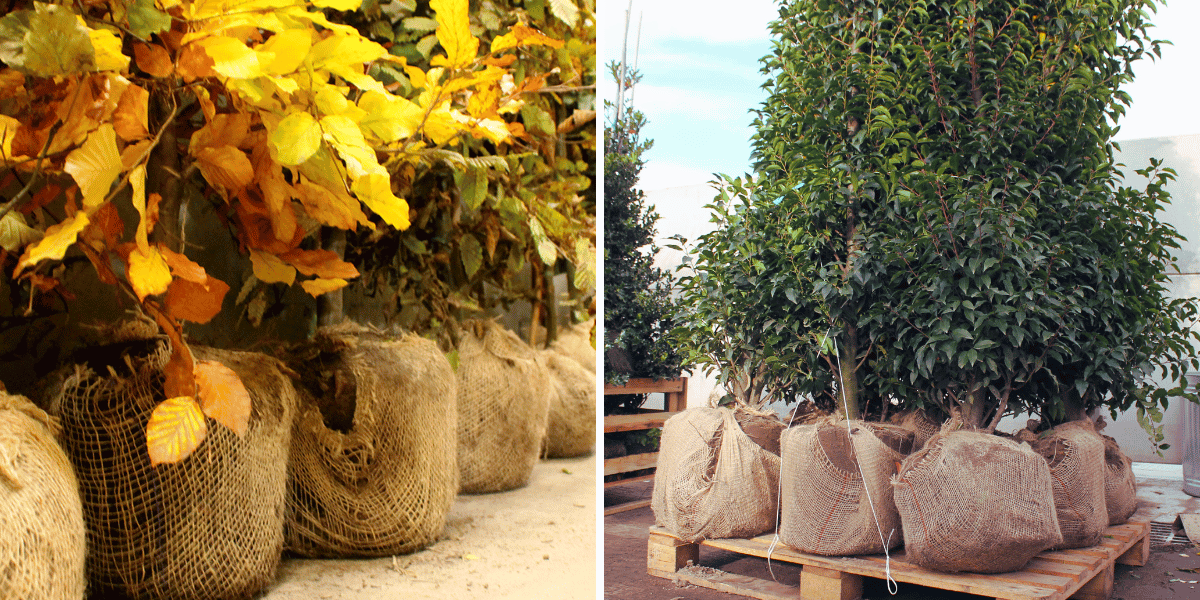
A root ball is a field-grown plant that’s scooped out of the ground by a special machine that removes the roots in a ‘ball’ of soil. This is to maintain the established roots and protect the plant until it's replanted into the ground. After they’re extracted, each root ball is carefully wrapped in hessian or burlap to keep the soil ball intact and secure during transport and planting.
This method means that the plant's root system is already well-established, making root ball hedging an excellent choice for achieving strong growth and quick establishment in your garden.
Root balls are common for most evergreen hedge species, including Yew, Leylandii, and Laurel. Balling the roots keeps them intact, ensuring they remain healthy and ready to establish in their new location.
The benefits of root balls include:
Environmentally friendly — Root ball hedges are delivered without plastic pots and use a biodegradable material to wrap the roots, making them a more sustainable option.
Quicker establishment — With the roots already in contact with the soil, root ball hedging often establishes itself faster once planted.
Suitable for larger hedges — Root ball hedges can grow taller and fuller due to their already-mature root system, providing an immediate impact on your garden.
On the other hand, some drawbacks include:
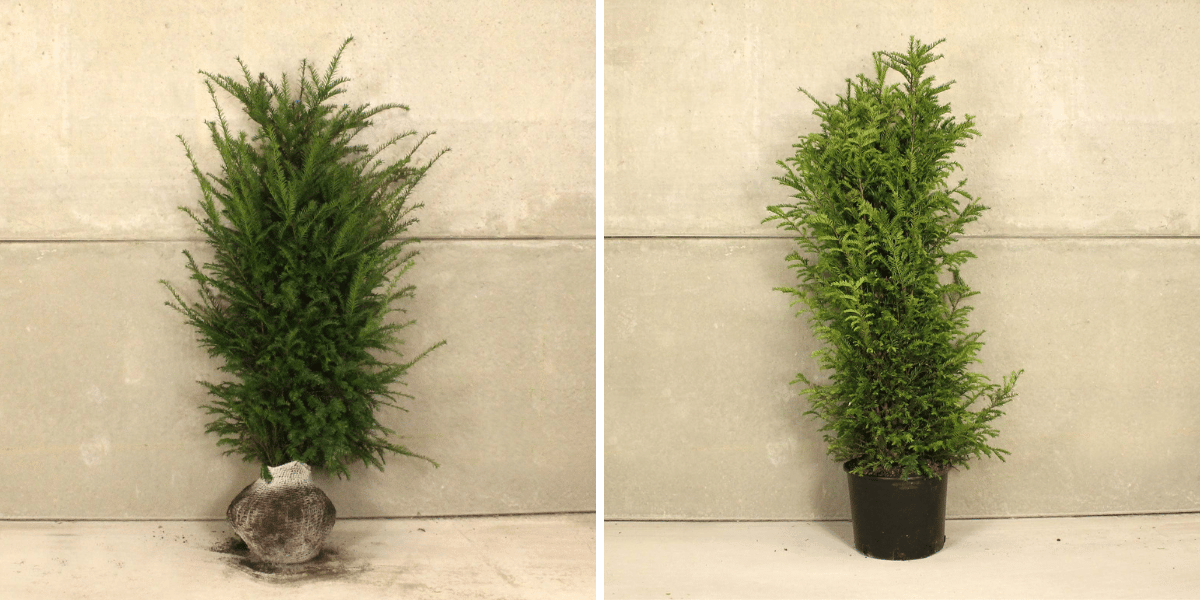
What’s the difference between root balls and potted hedges?
While both root ball and pot-grown hedging can help you create beautiful garden boundaries, the main difference between them is how the plants are grown and prepared for planting.
Root ball hedges are grown directly in the ground, allowing their roots to develop naturally without the restriction of a pot. When it's time to transplant the hedge, the root system is carefully wrapped in burlap or hessian to keep it intact. This makes root ball hedging ideal if you're looking for larger, more mature plants, as their roots are already well-established.
On the other hand, potted hedges are grown in containers, meaning their roots are more confined. They can be brought into your garden at any time of year and are much easier to move around, but the restricted root space can sometimes limit the amount of growth you can expect to see — until planted in, at which point the plant will thrive.
If you’re unsure which rooting method is right for you, learn more about the four types of hedging root types here.
When to plant root ball hedging
Ideally, you should plant your new root ball hedge as soon as possible after receiving it to give the roots the best chance to establish and prevent them from drying out while in storage. Before planting, ensure the ground isn't frozen, waterlogged, or covered in snow, as these conditions can make planting more difficult and affect the hedge's growth.
The best time to plant root ball hedging is during the dormant season, which usually runs from November to March. During this period, the plant's growth slows right down, making it less likely to suffer from 'transplant shock' (failure to thrive once planted into the ground) and giving the roots time to settle before the active growing season begins.
When not to plant root ball hedging
While it can be frustrating to wait until the dormant period, planting root balls outside of this timeframe is generally not recommended and root balls are not usually available outside of this time anyway. This is because during the warmer months, the plant is actively growing and needs more water and nutrients, making it harder for the roots to establish in a new environment.
There are also some ground conditions to look out for too, even during the dormant period. Conditions like frost, waterlogged soil, or dry, compacted earth should all be avoided. Planting in frozen ground can damage the roots, while waterlogged soil deprives them of the oxygen they need to grow. Similarly, dry and compacted soil can make it difficult for the roots to anchor and absorb nutrients properly.
How to prepare the planting site
Proper soil preparation and clearing the planting area are key to helping your root ball hedge thrive, even if you only plan to install smaller plants.
- Clear any weeds — Weed control is crucial to a happy and healthy hedge. Before planting, remove any visible weeds to prevent competition for nutrients and space.
- Fertilise the soil — Dig over the soil to loosen it, and consider mixing in well-rotted garden compost to improve the soil condition. For the best results, boost nutrient levels with fertiliser or bonemeal. If using bonemeal, ensure it's thoroughly mixed into the soil to prevent it from coming into direct contact with the roots, stems, or leaves, as this can cause scorching.
- Dig a trench — Prepare a trench that's one-third wider than the root ball and the same depth as the root ball itself. For small root balled plants (plant height up to 60 cm), we recommend digging over a trench at least 30cm (12") wide and 25cm (9") deep. For larger plants, increase the depth to ensure the roots have plenty of room to spread.
- Loosen the trench soil — If necessary, loosen the sides and bottom of the trench with a fork to create better drainage routes.
How to plant root ball hedging in 4 steps
Once you've prepared the planting site, it's time to put your root ball hedging in the ground. For a simple, straightforward method, follow these four steps:
Prepare the roots
Start by inspecting the root ball for dead or damaged roots and carefully trimming them away using clean secateurs. This helps to promote healthy new growth.
You can also apply a root supplement like Rootgrow (as recommended by the Royal Horticultural Society) by dusting it over the root ball to encourage strong root development. This gives plants a boost of the friendly fungi they use to help them find moisture and nutrients in the soil. We’d also recommend mixing a fertiliser like Bonemeal into the topsoil from the planting hole, taking care not to let it come into direct contact with your plant’s roots, to further enrich the soil and give your root-ball hedge an even stronger success rate. Or you can sprinkle on the soil surface and water in.- Plant the hedge
Place the root ball into the trench or hole you prepared earlier, making sure the top of the ball sits level with the surface. Avoid burying the stem or planting the roots too deep, as this can suffocate the plant. As you plant the hedge, position each plant at an equal distance apart to create a neat and even line without the roots competing for resources. - Backfill the trench
Fill the trench or hole with the soil you dug out earlier, pressing it down gently to remove air pockets. This helps provide firm contact between the roots and the surrounding soil, allowing them to establish properly. - Water thoroughly
Once planted, water the hedge generously to help the soil settle and provide the roots with the moisture they need to thrive. Keep an eye on the hedge over the next few weeks, particularly during dry periods, to ensure the soil doesn't dry out.
Find more information on how to plant hedging here. You can also watch radio presenter Sam PInkham planting his own English Yew root ball hedge at home. View the video below.
Aftercare and maintenance
While the hardest part of installing your new hedge is behind you, how you care for your root ball hedging once it's planted makes a big difference in how well-established the plant will be. Your hedges will need regular attention to keep them healthy and encourage growth.
Here's how to keep your hedging in top condition:
Watering
Watering your hedge regularly is vital, especially in the first few weeks after planting. Newly planted root ball hedges require consistent moisture to help their roots settle and grow properly. This is especially important during dry spells, so ensure the soil around the hedge stays damp but not soggy. When the weather is dry, use at least 5 litres of water per metre of hedging twice per week, and always water your hedging plants in the evening so that the sun doesn’t evaporate the water.
Pruning
Regular pruning keeps your hedge looking tidy and full, but it's about far more than maintaining your hedge's shape. It also helps maintain the health of your plants by removing any dead foliage that otherwise would take away energy from healthy growth. During the dormant season, remove any damaged foliage and lightly trim back overgrown areas to encourage the plant to grow evenly.
Fertiliser
While fertilising the soil before planting is recommended, occasionally replenishing the soil with nutrients is another way to encourage strong root development. Apply a balanced fertiliser to the soil once or twice a year, in spring or autumn, to keep the ground around your hedging plants in good condition.
However, if you’re planting Yew or Box in heavy or waterlogged soils, avoid applying mulch, as this can trap moisture and create an environment for bacteria and mould.
Weeding
Any gardener will be familiar with the common bane of weeds creeping back into the soil around your plants and competing for nutrients and water. When you plant your root ball hedge, it’s vital to keep weeds and grass away for the first 2-3 years. This gives the plant the best chance of survival and helps it establish strong, healthy root systems.
Root ball hedging troubleshooting
Even with careful planning and planting, your root ball hedging can sometimes encounter common gardening challenges. If your hedge isn't establishing as expected or you're noticing signs of stress, it could be due to one of these issues:
Weed control — Weeds can compete with your hedge for nutrients, water, and space. Look out for any unwanted plants growing near the base of the hedge and remove them regularly to ensure your hedges have the resources they need.
Frost — Frost can damage young hedging by freezing the roots or foliage. Signs of frost damage include blackened leaves and stunted growth. You can protect your hedge by avoiding planting when frost is forecast and using horticultural fleece during unexpected cold snaps.
Wind rock — Strong winds can loosen newly planted hedging, making it harder for the roots to establish and potentially even knocking the hedge over. Check for plants showing signs of leaning or lifting out of the soil, and if necessary, firm the soil around the base or use bamboo canes to secure taller hedges.
Rabbit damage — Rabbits and other wildlife may nibble on your hedge, damaging the bark and foliage. Signs to look for include gnawed or stripped stems and clear bite marks around the edges of leaves — particularly near the base of the plant. Unlike with other root types, rabbit guards can’t be used on root-ball plants. Instead, you can try using chicken wire to create a physical barrier or applying homemade natural deterrents. Rabbits are sensitive to scents, and some report that applying coffee grounds, cayenne pepper, or garlic powder around the base of your plants can be effective at keeping them at bay. Just be sure to reapply regularly or after it rains.
Choosing the right root ball hedging
Root ball hedging comes in various species, offering options for privacy screening, garden borders, and even topiary. Whether you're looking for tall, dense coverage or a more decorative touch, there's a root ball hedge to suit every garden.
Here are some of our favourite root ball hedges:
Hawthorn (Crataegus monogyna)
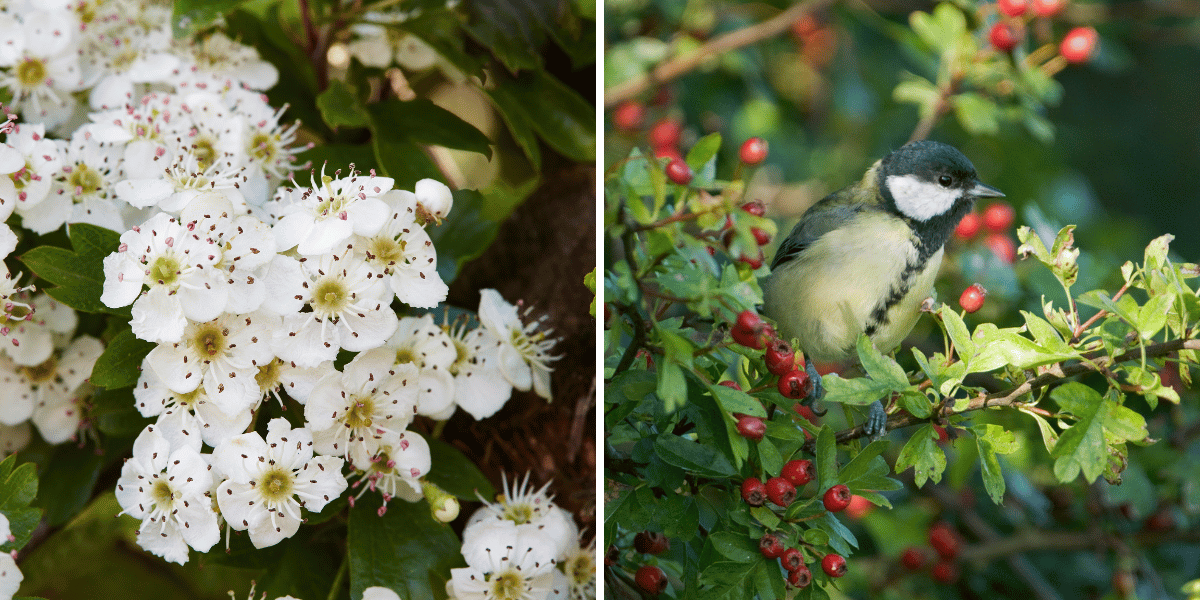
Hawthorn is a native flowering hedge species known for its dense, jagged-edged foliage and seasonal colour. In spring, it produces clusters of small, white flowers; in autumn, it produces red haws (round, edible fruit), attracting birds and other wildlife.
Growing at an average rate of 40–60cm per year, it's a low-maintenance option that thrives in well-drained soil and both sunny and partially shaded spots. It's perfect for creating a robust, wildlife-friendly hedge in most gardens.
Leylandii (Cupressocyparis leylandii)
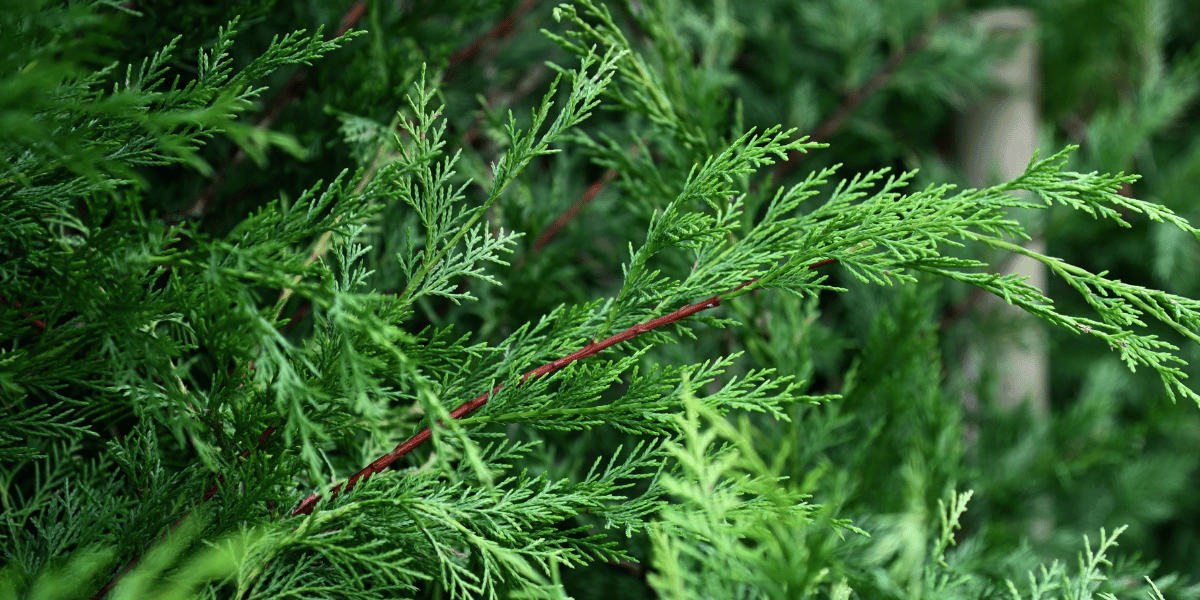
Leylandii is one of the fastest-growing evergreen hedges, with an impressive growth rate of up to 90cm per year. Its dense, spindly foliage is excellent for privacy and soundproofing. Not only this, Leylandii, along with Western Red Cedar, Cherry Laurel, and Portuguese Laurel, come in over 2,500,000 impressive rootball specimens – and these are some of our most popular rootball species!
Leylandii prefers well-drained soil and sunny conditions, so it's best for gardens that receive a lot of natural light. While it grows rapidly, it's easy to maintain at your desired height with regular pruning.
English Yew (Taxus baccata)
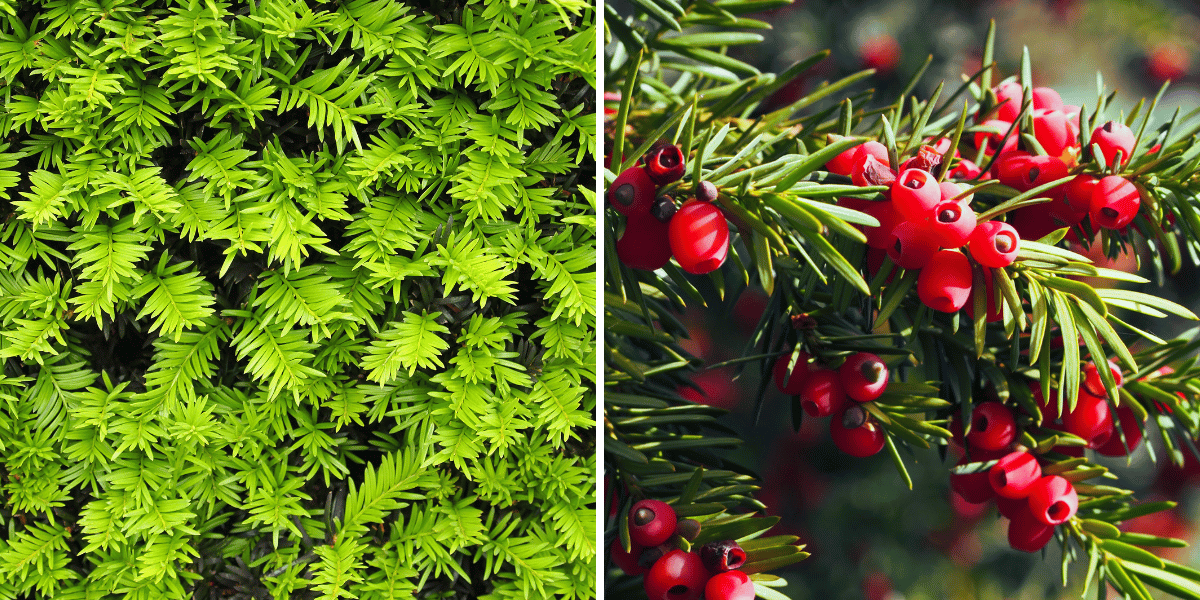
English Yew is a classic native species, prized for its dark green, pine-like foliage. Growing at a steady rate of 20–40cm per year, it's slower than some of the other species mentioned in this list but offers a wide range of uses — from topiary to neat garden boundaries.
Yew hedging thrives in well-drained soil and tolerates sun and shade, making it an excellent choice for most gardens.
H3: Beech (Fagus sylvatica)
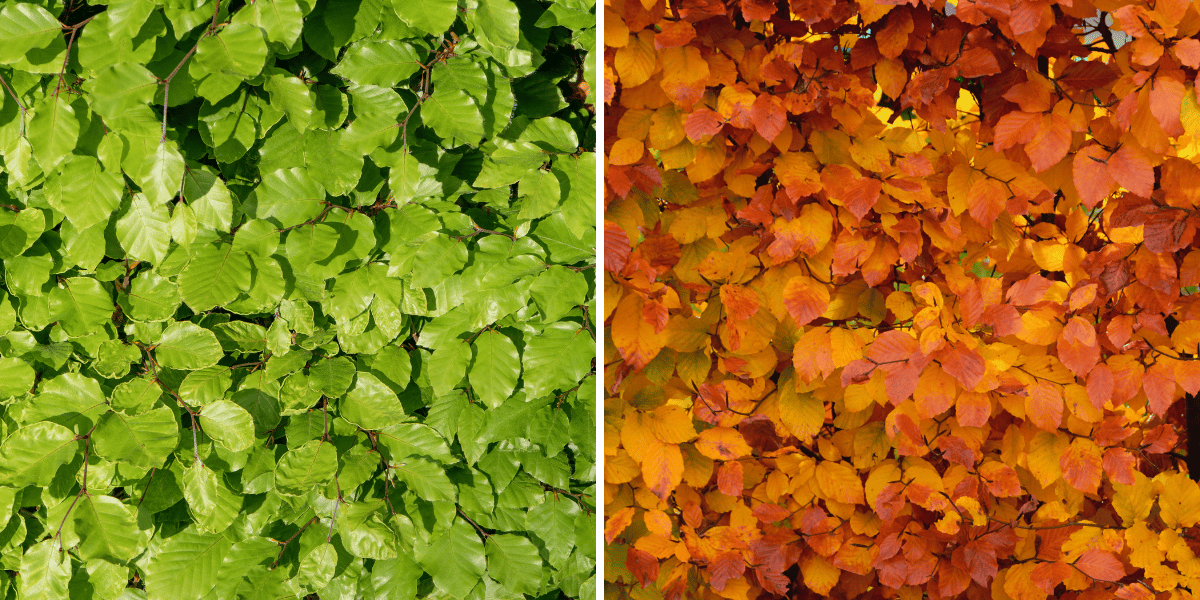
Beech is a deciduous and semi-evergreen hedge, meaning its wavy-edged leaves lose their glossy green colour in autumn. However, unlike many deciduous species that shed their leaves shortly after changing colour, it retains its rich, copper leaves well into winter.
This hedge grows at a rate of 30–60cm per year and is fairly adaptable, thriving in most well-draining soil types, including sandy and chalky. Its tolerance for full-sun and part-shade conditions makes it a reliable choice for a variety of gardens.
Frequently asked questions
Are you supposed to remove burlap from root balls?
When planting, you don't need to fully remove the burlap or hessian wrapping from root balls, as these materials are biodegradable and will break down into the soil over time. However, you should gently loosen the wrapping if it's particularly tight to allow the roots to spread into the surrounding soil.
Are all hedges available as root balls?
Not all hedges are available as root balls. This method is most commonly used for evergreen species as the intact root system helps them establish quickly, while deciduous plants are often sold as bare root or potted varieties instead. However, this isn't a concrete rule. You will occasionally find evergreen species that are more suited to bare root or pot-grown rooting or deciduous species — like Hornbeam — that can be grown as a root ball.
How long does it take for a root ball hedge to grow?
Root ball hedges generally establish quickly due to their intact and more mature root systems. With proper care and maintenance, most root ball hedges will begin to show strong growth within the first year after planting. Growth rates vary by species — for example, Leylandii can grow up to 90cm per year, while slower-growing species like Yew may grow 20–40cm annually.
Can you store root ball hedging before planting?
If you're not ready to plant your hedging immediately after receiving it, root ball plants can be stored for a few days in the right conditions. Keep them in a cool, shaded area — like a sheltered garage or shed — and ensure the root ball stays moist at all times. Avoid storing your hedging in a greenhouse and letting the roots dry out or become waterlogged, as this can cause them to die off or start to rot. For the best results, plant as soon as possible.
Shop root ball hedging with Hedges Direct
Root ball hedging is an excellent way to create a thriving, long-lasting hedge with minimal effort and gardening know-how. Whether you're looking for year-round privacy or added height and structure in your garden, root ball hedges offer a reliable solution.
Ready to find the perfect hedge for your garden? Explore our range of root ball hedging today at Hedges Direct.